Looking for the older version first? The original full-length Ghostbusters (NES) legacy walkthrough is still live if you want the earlier page alongside this guide.
Ghostbusters on NES makes a lot more sense once you stop treating it like random chaos. It is really a city-management run with driving, trap timing, ghost-catching, and endgame survival layered on top.
This guide walks through the run from the opening shop visit to Gozer and points out the choices that usually decide whether the game settles down or falls apart.
Quick rules the game barely explains
- You can carry only four different item types at once.
- You can buy up to three regular Capture Traps, or switch to one Super Trap later for unlimited storage.
- You need a Beam before the game will let you enter haunted buildings.
- Selling gear only gives back 50% of the purchase price.
- Ghost Alarm lets you spot haunted buildings from a distance instead of only when you drive near them.
- Ghost Food gives you two uses on the stairway, and the Anti-Ghost Suit gives you six extra hits.
The full game loop, start to finish
A successful run usually looks like this:
- Start the game and go straight to the shop.
- Buy only the gear that helps your first few busts.
- Pick haunted buildings without wasting gas on long detours.
- Catch ghosts, cash them in, and keep the city’s PK energy from racing upward.
- Return to headquarters before full traps or bad routing wreck your momentum.
- Build enough money and stability to make the final push to Zuul’s building.
- Survive the Zuul stairway and the Gozer fight.
Once you see that loop clearly, the game stops feeling nearly as random.
Best opening buy
The safest practical opening is still the one that gets you into buildings and lets you finish captures reliably:
- Ghost Vacuum – $2,500
- Capture Beam – $3,000
- 2 Capture Traps – $2,000
Total: $7,500
If you want a little more trap room right away, a three-trap version also works:
- Ghost Vacuum – $2,500
- Capture Beam – $3,000
- 3 Capture Traps – $3,000
Total: $8,500
A third trap can help if you can still afford a workable start, but the big mistake is spending too much on flashy extras before your basic setup is stable.
The city map is the heart of the game
Most bad runs start here, not in the action scenes.
A few habits matter more than anything else:
- go to the shop immediately
- favor nearby haunted buildings when possible
- run over map ghosts when the line is clean
- watch your trap capacity before taking another job
- do not wander without a reason
This game punishes indecision. Fuel disappears. The PK meter keeps climbing. A run that felt fine a minute ago suddenly gets expensive.
How to route the early game
The early game is about staying efficient, not heroic.
You want short trips, quick captures, and clean returns to headquarters when your traps are full. Long drives for a single building usually hurt more than they help.
- buy the core gear
- target nearby haunted buildings
- empty traps before you get greedy
- clip map ghosts to slow the city’s PK climb
- repeat until the run feels stable
Driving without wrecking your bankroll
Driving scenes matter because every sloppy hit costs money.
- avoid other cars first
- grab easy fuel barrels
- collect ghosts when it is safe and useful
- keep trips short enough that fuel stays manageable
The goal is not perfection. The goal is to stop every trip from becoming another repair bill.
What to buy, what to wait on
The shop matters more than a lot of players remember. Some items help immediately. Some are endgame tools. Some are only worth it once the run is already healthy.
Strong early priorities
- Ghost Vacuum: useful right away because it lets you profit from map and road ghosts
- Capture Beam: gets you into real busting work quickly
- Capture Traps: the basic capacity you need to keep the run moving
- Ghost Alarm: helpful once you want cleaner city-map reading
Mid-run or situational buys
- Hyper Beam: better than the Capture Beam once you can afford the upgrade cleanly
- Super Trap: great quality-of-life value if the run is strong enough to support it
- Ghost Food: mainly useful for the Zuul section
Endgame or lower-priority tools
- Sound Generator: aimed at Zuul’s stairway, not your opening loop
- Anti-Ghost Suit: defensive help for the endgame, but not your first concern
If the game is going badly, buying more random tools usually does not solve it. Better routing does.
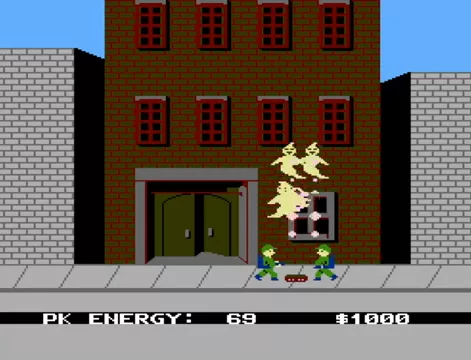
How busting works inside buildings
Once you enter a haunted building, the trick is not raw speed. It is control.
- get your Ghostbusters into position
- line up the beam properly
- place the trap where the ghost can actually be pulled over it
- finish the capture without panicking
A frantic bust wastes time and money. A calm clean bust keeps the whole run alive.
When to go back to headquarters
A lot of players stay out one stop too long. That is usually where the rhythm breaks.
- your traps are full
- the next route would leave you unable to cash in the next bust
- the cleanest play is to reset and start the next stretch under control
Going back to HQ is not wasted time. It is maintenance.
The PK meter is constant pressure
The city can survive some mistakes. It cannot survive being ignored.
- take shorter drives
- stop drifting around the map
- hit ghosts on the city screen when possible
- clear buildings efficiently
- return to HQ on time instead of gambling on one more stop
A lot of frustration in Ghostbusters on NES is delayed punishment from earlier map decisions.
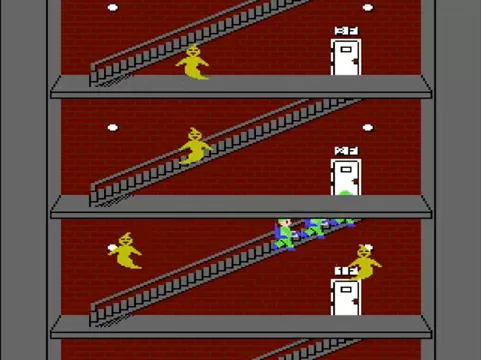
How the Zuul endgame works
The final push is where the game stops being forgiving.
You do not want to enter the endgame broke, under-equipped, or already hanging by a thread. By the time you make your move on Zuul’s building, you want enough money and enough control to survive mistakes.
Items like Ghost Food, the Sound Generator, and the Anti-Ghost Suit matter much more here than they do in the normal city loop.
Battling Gozer
Gozer is less intimidating when the rest of the game was healthy.
If your economy, routing, and equipment choices were solid, the final fight feels like a last test. If everything else was messy, Gozer exposes the mess fast.
How to win
- you bought practical gear first
- your driving stayed efficient enough to preserve money
- your trap management stayed under control
- you answered the PK meter instead of ignoring it
- you reached the endgame with enough margin to survive mistakes
How to lose
- buying the wrong equipment too early
- driving too long for no reason
- colliding away too much money
- carrying full traps and pretending it is fine
- letting the PK meter get away from you
- charging the Zuul section before the run is ready
Best order to learn the game
- the opening shop visit
- city-map routing
- safe driving
- clean building captures
- trap timing and HQ returns
- the Zuul endgame
- the Gozer finish
Once the first four feel natural, the whole game calms down.
Support pages for Ghostbusters on NES
The pages below break out the parts of the game players most often need help with.
- Ghostbusters (NES) Equipment and Shop Items
- Ghostbusters (NES) City Map and Building Guide
- Ghostbusters (NES) Ghosts, Enemies, and Bosses
- How to Beat Zuul and Gozer in Ghostbusters (NES)
Where to go next
- Ghostbusters (NES) main page
- Ghostbusters (NES) Equipment and Shop Items
- Ghostbusters (NES) City Map and Building Guide
- Ghostbusters (NES) Ghosts, Enemies, and Bosses
- How to Beat Zuul and Gozer in Ghostbusters (NES)
- Ghostbusters (NES) instruction booklet
- Ghostbusters (NES) legacy walkthrough
- Play Ghostbusters (1984) online
- Ghostbusters II (NES)
- Ghostbusters (Sega Genesis)